Clearing jams
Procedures in the following sections correspond with a jam message that might appear on the control panel.
Jam in tray 1
| 1.
| Remove the media from tray 1.

|
| 2.
| Grasp the jammed sheet by both corners and pull.

|
| 3.
| Place the media stack in tray 1.

|
| 4.
| Confirm that the media guides are against the media without bending it.

|
| 5.
| Press OK to resume printing.
|
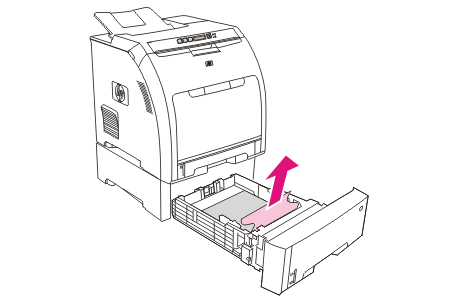
Jam in tray 2 or optional tray 3
| 1.
| If the optional tray 3 is installed, pull it out and place it on a flat surface. If the jammed sheet is visible, remove it.

|
| 2.
| If the sheet is not visible, check inside the printer at the top of the tray opening. Remove any jammed media.
|
| 3.
| Pull out tray 2 and place it on a flat surface.

|
| 4.
| If the jammed sheet is visible, remove it.

|
| 5.
| If the sheet is not visible, check inside the printer at the top of the tray opening. Remove any jammed media.

|
| 6.
| Replace tray 2 and optional tray 3.

|
| 7.
| Press OK to resume printing.
|
Jam in print paper path
For this control-panel messages, look in two areas for jams. First, check the front door area for a jam. Next, starting with step 6, check the top cover area.
| 1.
| Open the front door.


| CAUTION
|
Do not place anything on the transfer unit. Do not touch the top of the transfer unit or the contacts on the left side of it.
|

| NOTE
|
If the sheet tears, make sure that all fragments are removed before resuming printing.
|
|
| 2.
| Remove any visible media.

|
| 3.
| Locate the green registration-plate tabs that are below the bottom print cartridge.

|
| 4.
| Press the tabs, and then lift the registration plate. Remove any jammed media, and then return the registration plate to its closed position.


| NOTE
|
If the sheet tears, make sure that all fragments are removed before resuming printing.
|
|
| 5.
| Close the front door.

|
| 6.
| Open the top cover.

|
| 7.
| If the jammed sheet is visible, remove it and then close the top cover.

|
| 8.
| If the sheet is not visible, use the power switch to turn off the printer.


| WARNING!
|
The fuser will be hot. Wait 10 minutes before proceeding.
|
|
| 9.
| Place your thumbs on the fuser latches, squeeze the latches, and pull up on the fuser to remove it.

|
| 10.
| On the fuser, lift the shutter door.

| CAUTION
|
Do not open the shutter door while the fuser is in the printer.
|

|
| 11.
| Remove any jammed sheets.

| NOTE
|
If the sheet tears, make sure that all fragments are removed before you resume printing.
|

|
| 12.
| Hold the fuser with your thumbs on the latches, and then push both sides of the fuser into the printer. Press the fuser down until it clicks into place.

|
| 13.
| Close the top cover and then turn on the printer.

|
Jam in output bin
For this control-panel message, look in two places for jams. First, check the output bin area for a jam. Next, starting with step 3, check the top cover area.
| 1.
| Look for jammed paper in the output bin area.
|
| 2.
| Remove any visible media.

| NOTE
|
If the sheet tears, make sure that all fragments are removed before resuming printing.
|

|
| 3.
| Open the top cover.

|
| 4.
| If the jammed sheet is visible, remove it and then close the top cover.

|
| 5.
| If the sheet is not visible, use the power switch to turn off the printer.


| WARNING!
|
The fuser will be hot. Wait 10 minutes before proceeding.
|
|
| 6.
| Place your thumbs on the fuser latches, squeeze the latches, and pull up on the fuser to remove it.

|
| 7.
| On the fuser, lift the shutter door.

| CAUTION
|
Do not open the shutter door while the fuser is in the printer.
|

|
| 8.
| Remove any jammed sheets.

| NOTE
|
If the sheet tears, make sure that all fragments are removed before you resume printing.
|

|
| 9.
| Hold the fuser with your thumbs on the latches, and then push both sides of the fuser into the printer. Press the fuser down until it clicks into place.

|
| 10.
| Close the top cover and then turn on the printer.

|
HP color laserjet 2700 Clearing jams


